Friday, March 13, 2015

Our New Dog, Olaf!

This was a crazy but wonderful week! I wanted to introduce you to the latest member of our family. This is Olaf, our new dog, and he is a 3 1/2 year old Bichon/Poodle mix. He loves hugs, lots of love and attention, and enjoys going on walks and watching television! We have never had a dog that actually watches tv, but this one sure does! :)
I'm not into many crafts at the moment since we are in the middle of renovating our home to sell, but hope to have some projects up soon.
Check out my Pinterest page, using the link on the right. I have some pins that may be of interest to you. :)
Mimi


Friday, March 6, 2015

Getting Back Into the Swing of Things

Well obviously this is now 2015, and I haven't posted in awhile.
I'm getting organized somewhat now after a busy few years, and plan to begin posting on a regular basis.
I do have a Pinterest Page, Mimi Rose Creative Designs, if you care to check out my boards, and you'll find the link to it here on the right-hand side of my blog page.
My goal this year is to finish some craft projects, I'm mentoring at our local middle school, and am in the process of starting a Gluten Free Baked Goods business, locally.
So I will not only be posting crafts and projects, but baked goods that I have made as well, and occasionally a recipe to go along with them.
We just moved, so I am looking forward to getting my craft room put together, and will post pics once I get started.

Enjoy your day, and thanks so much for stopping by.

MimiRose

Thursday, February 7, 2013

Clay Pot Lighthouse

This is a lighthouse I made for my daughter-in-law's parents, and they now have it situated in the yard. I was pleased with the outcome.

 
I wrote down a list of the supplies I used, and have since misplaced it. :(
However, I can give you the details except the pot measurements, and will estimate them. I didn't have any instructions, so just went to Home Depot and experimented with clay pots.

The bottom and top pot are just standard clay pots, however, the middle pot is an azalea clay pot, because the lighthouse required one in the middle that wasn't so tapered. I believe the top one is the six inch, and the bottom is either ten or twelve inch. As I said, go to Home Depot and experiment to get the look you want.

For the paint (on all items), I used DecoArt Acrylic Patio Paint Outdoor, white, black, and red. I ended up buying way too much, thinking the clay would absorb much more, and used sponge brushes. I gave the pots at least four coats of white paint to seal them well, and still only used not all of a large container of white paint. So one container of each color is sufficient. Allow at least an hour or two between coats to dry. The red tray under the lantern is a clay pot tray, coated with red paint.

I created a stencil for the windows and door. (the windows will line up when the pots are aligned)

The lantern on top is from IKEA. They have other colors, sometimes, so you could possibly go with white or red if you wanted. It holds one tealight candle.

This is not my original idea. I found one similar on Pinterest, but there were no instructions, which is why I have tried to explain my process to save you some guess work.

Thank-you for reading my post, and this is a fun gift idea for anyone who enjoys lighthouses.

Blessings,
Mimi

Monday, December 3, 2012

T-Shirt Quilt for Another Nephew

This quilt is for my sister's second born son, for his 16th birthday. I still have two more quilts to make, one for my daughter-in-law, and one for my oldest son out of shirts from the community theater he worked at.

T-Shirt Quilt for my nephew's 16th birthday

My sister found out about the quilts I had made for my sons, so she asked me if I would make one for her boys 16th birthdays when the time came, so I said I would. She mailed me their shirts, and this is the first one, which was for her oldest son.

My Youngest Son's T-Shirt Quilt Graduation Gift

Here is the second quilt I made, which was for my youngest son's graduation gift. Again, I used the fronts, backs, and sleeve designs for the squares, and included squares from fabric that represented his interests (the outdoors, cards, etc.) We homeschooled, so this and my other son's quilt were on display at their graduation receptions, an idea I had gotten from another mom from a previous high school graduation reception.

T-Shirt Quilt for my oldest son's graduation gift

I have made a few t-shirt quilts in the past, so am going to post pics of them. This is the first one I made, which was a graduation gift for my oldest son. I cut out the fronts (and backs if there was a design on it), and also logos from sleeves, and made them into quilt squares. For this one I didn't have enough squares, so I used material from other shirts in places, and also included a blank square for his friends to sign.

Bridal Shower Favors, Tea Pockets

These are "pockets" I made for my daughter-in-law's bridal shower recently. Her sister was giving her a tea party shower, and asked me to make the favors, which I enjoyed doing. I was happy with the way they turned out. Inside each one I placed a tea bag and cinnamon stick.

Wedding program, vintage theme

This is the wedding program that I made recently for my youngest son's wedding. I soaked the papers in tea, then printed the information he and his bride wanted in "parchment" font, and tied the pages together with raffia. I also burned the edges of the pages to give it more of an aged look. Some pages were darker than others, depending on how well the tea soaked in. I was pleased with the results.

Decoupaged Bookshelves, the back side


I wanted to use bookshelves in my craft room for storage, but as dividers instead of against the wall. The problem, as you know, is that the back of bookshelves (inexpensive ones) is just particle board, which is unattractive. I have three bookcases, so I decided to decoupage one, then invited my daughter-in-laws to each decorate one if they wanted, and they did. Here are the results. I still need to put a coat of Mod Podge on to seal them, but we were all happy with how they turned out! The photo of only two shelves are the ones my daughter-in-laws created, and the "wedding cake" on top of the purple shelf is made from boxes that I decoupaged.

Monday, October 1, 2012

Bass Clef, handcrafted

My son, who creates fine writing instruments, designed and handcrafted this bass clef for his brother and sister-in-law. It is approx. 20" in length. I am quite proud of his fine workmanship!


Monday, September 24, 2012

Latest update

I have been busy with weddings this year, so got behind with posting. However, my goal is to begin posting each week, with photos of what I am working on.
My oldest son got married in March, my parents celebrated their 40th Wedding Anniversary in May for which my siblings and I hosted a small wedding for them to renew their vows, and my youngest son is getting married next month, in October. So I have been busy with helping, including helping with favors and decorations for wedding number one, making all of the favors and decorations for wedding number two, and creating rsvp cards and a banner for wedding number three (in addition to shopping for vintage items which will be props).
I will be posting photos of some of the above items this week, and soon will begin posting items for sale in my etsy shop. I also have a facebook page, which is Eclectic By Design, with my name in there somewhere. :)

Monday, July 9, 2012

More Alcohol Ink on Ceramic


My husband and I had a birthday party last night for our daughter-in-laws, so after dessert, we went to my craft room and used alcohol inks on ceramic tiles to create some fun designs, and everyone had a great time!

VBS Craft, Alcohol Inks On Ceramic Tile


In a VBS craft class, my students used alcohol inks to create designs on ceramic tiles, which may be used as coasters or trivets. (I expect they should be protected with acrylic sealer, however.)

Wednesday, January 25, 2012

Craft Class

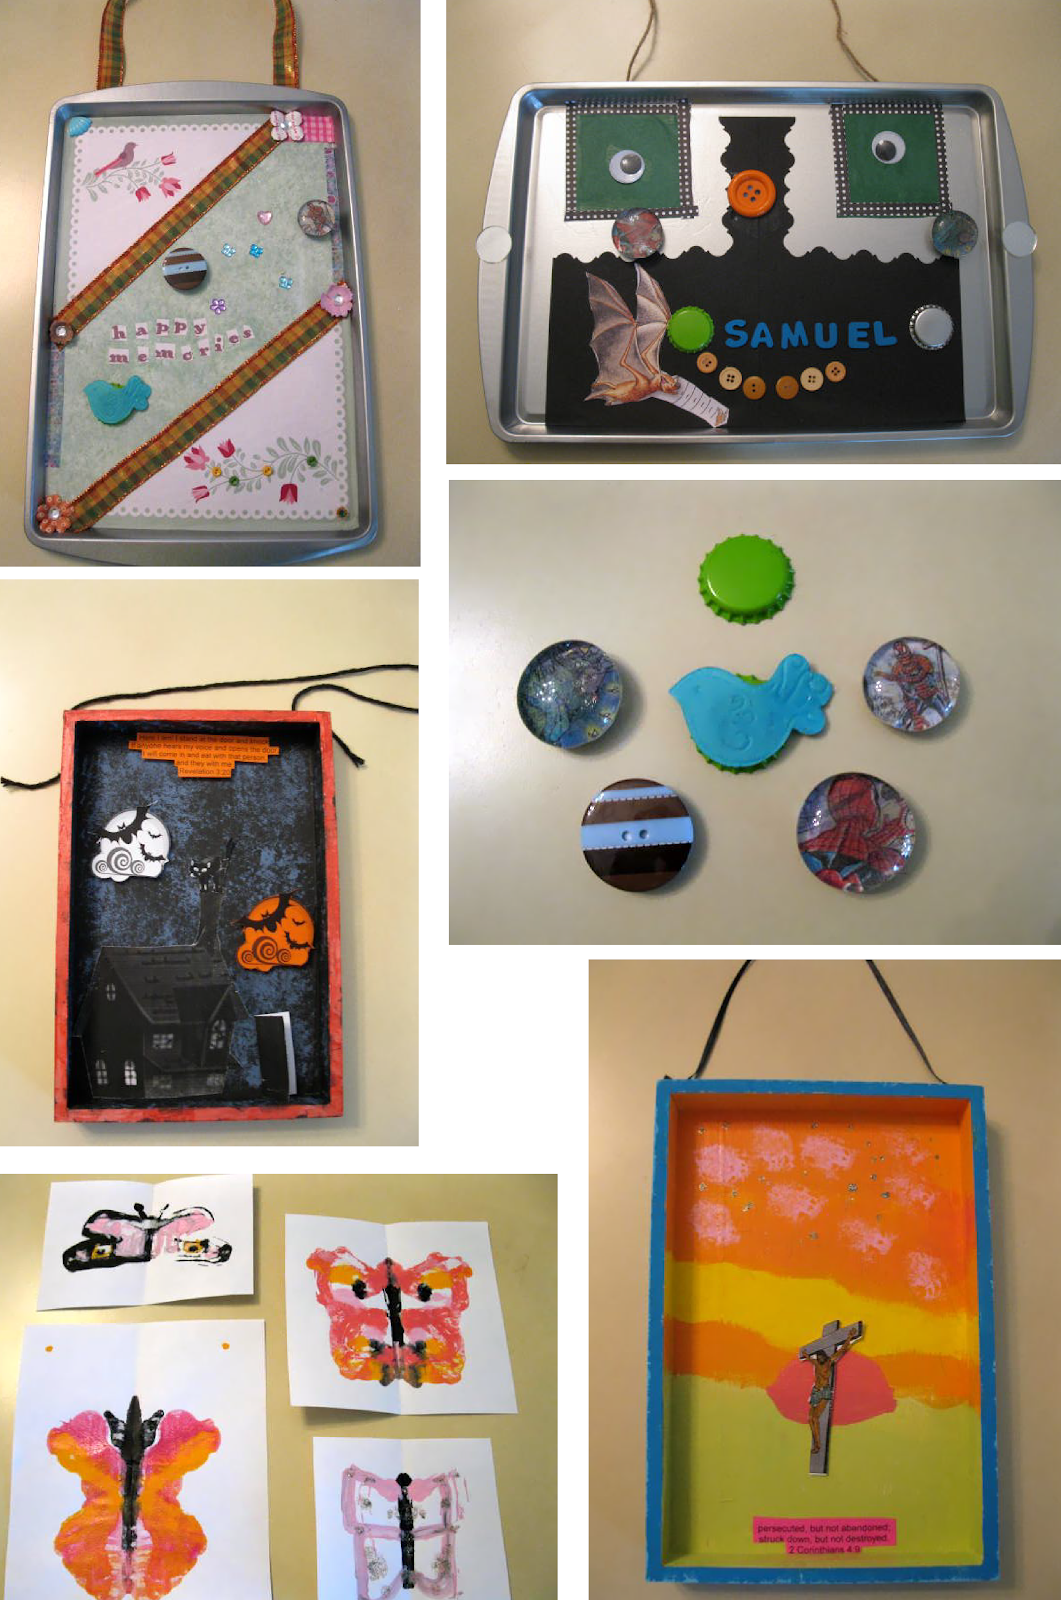
My new year's project is working with a homeschooling family on Fridays, to teach them art/crafts. We are having fun! They are currently learning how to decoupage, and we have some other fun projects lined up. In this photo, they decoupaged cookie sheets to create a magnetic board, then made their own magnets using bottle caps and clear stones, and using clear glue to attach a design to the back. For these particular magnets, they chose comic strips and scrapbook paper designs. They also designed and created shadow boxes using paints, papers, glue, and ribbon. The butterflies were made with paint and q-tips, painting the design on one half of the paper, then folding it and pressing down to create the other side - much like the finger painting we did years ago. It was a quick way to fill some time at the last minute. These projects were spread over a couple of weeks.

Catching Up

Well I haven't posted in awhile, but have been busy. I am currently making origami flower balls for Dan and Jess' wedding, and I think we are close to having most of the petals completed, except for the additional ones that will more than likely be needed. It takes 60 petals to complete one flower ball, and I believe we have enough for approx. 12 balls to date. Once they are folded, then we will begin gluing. Jess and I are working on it together. I will post pictures of them once completed, but here is a picture of a few of the petals in progress. They are approx. 1/3 of the way folded in this photo. There are several more folds to complete each petal. This is only a small portion of them.

Thursday, January 12, 2012

This is a no-sew purse I created from a jean pocket as a birthday gift.
To make one, just cut a pocket from an old pair of jeans (if you don't have a pair - pick some up from a thrift store), and add embellishments with a hot glue gun.
For this purse, I added purple ribbon topped with sequin trim, pink leather flowers, clear gems, silver braided cord embellished with a bow, charm, and sandal buttons (back cut off first), pink ribbon to the raw edge on the top back, and lavender ribbon for the "handle".

You can also use jean pockets as refrigerator magnets to use for your shopping list. Just decorate with trims/findings you have on hand, glue a magnet on the back (magnetic strip, or several small round magnets), then insert pen/pencil and VOILA! You have a fun shopping list holder!

Monday, December 26, 2011

Wedding Projects

During January I will be working on origami wedding favor boxes, as well as origami flower balls as part of the decorations for my son and daughter-in-law's wedding, so watch for photos. I can post instructions if anyone is interested.

Sunday, December 25, 2011

First "Altered" Book /Journal

This is my first "Altered" book using a Stuart Little book, and was made as a Christmas gift for Stephen's girlfriend, Beth. She had requested a handmade journal for Christmas. The photos seem to disappear from this post, however, you can see them in the slideshow near the top of the blog.

Bridal Shower "Cake"

This is a cake I made for Jess', my future daughter-in-law, for her bridal shower. I saw this idea in an edition of Woman's World, and modified it for the occasion.
This one looks nothing like the one I saw, but the concept is the same - to present a gift in the form of a cake. The example included china place settings for two.
This cake includes Crate and Barrel dishes and on the top, bone china snowflake tea votive cups - all of which was on Jess and Dan's bridal registry. The "cake" is actually decoupaged boxes, decorated with lace, trims, and flowers. (the example called for foam covered in wrapping paper)
It is easy to do if you need a centerpiece for a special occasion, and is a neat way to present a gift!